Node.js on a VPS: Our Nginx & PM2 Deployment Guide
Moving our first major project from a Platform-as-a-Service (PaaS) to our own Virtual Private Server (VPS) was a big step for our team. We were chasing more control, better performance, and, honestly, lower costs in the long run. We knew it would be a learning curve, but we were ready to get our hands dirty.
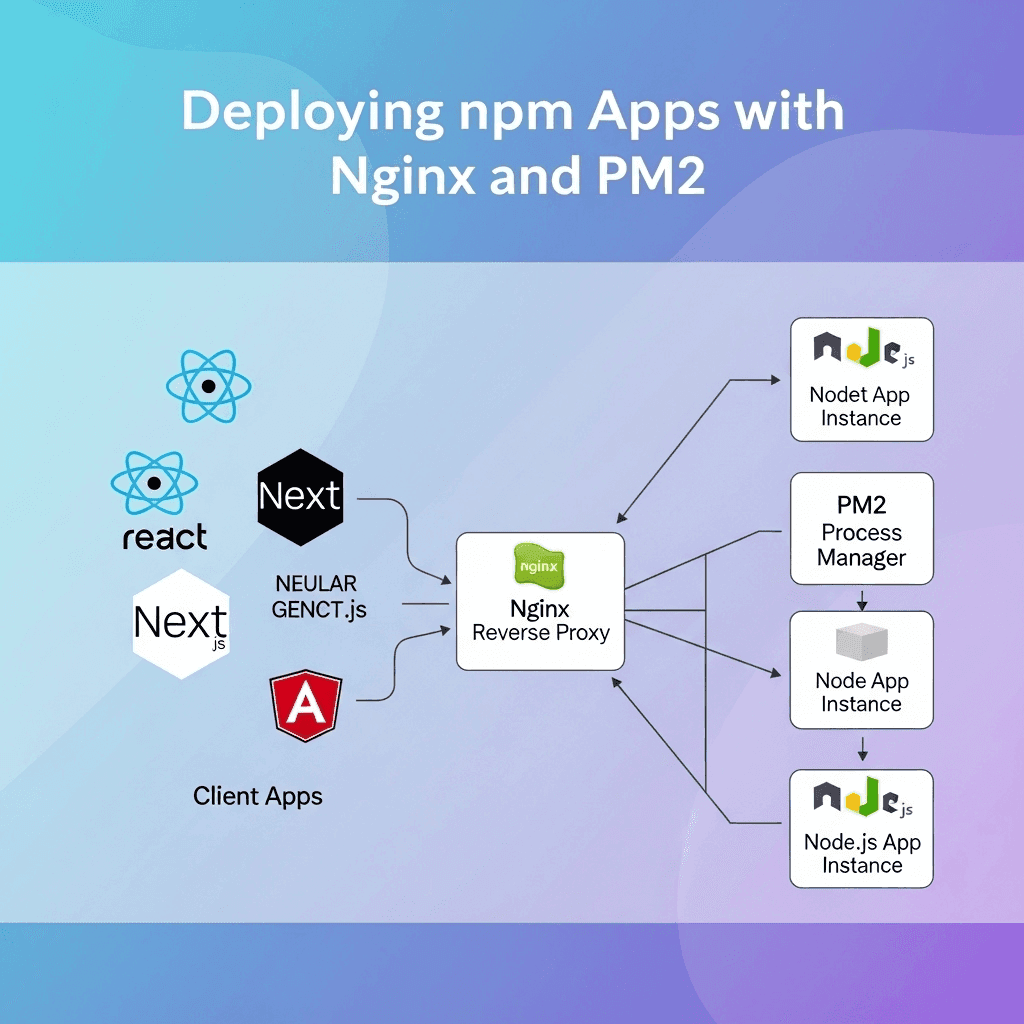
This is our story and our guide for deploying a Node.js application on a VPS, using Nginx as a reverse proxy and PM2 to keep it running. It’s not just a list of commands; it’s the process we pieced together, complete with the hurdles we hit along the way.
The Core Tools: What and Why?
Before diving in, let's quickly cover the key players:
- VPS: Think of it as your own private, empty server in the cloud. You have full control, which is both powerful and a little daunting. We used a standard Ubuntu server from DigitalOcean, but these steps apply to most Linux providers.
- Nginx: A high-performance web server. We use it as a reverse proxy. It accepts incoming web traffic (on port 80 for HTTP and 443 for HTTPS) and forwards it to our Node.js app, which is running on a different, internal port (like 3000).
- PM2: A process manager for Node.js. If our app crashes, PM2 will automatically restart it. If the server reboots, PM2 will automatically start our app back up. It’s essential for a production environment.
Step 1: Prepping the Server
First, we had to get our fresh VPS ready. After SSHing into our new server, we ran the standard updates and installed the essentials.
# Update package lists and upgrade existing packages
sudo apt update && sudo apt upgrade -y

# Install Node.js (we used nvm to manage versions)
curl -o- https://raw.githubusercontent.com/nvm-sh/nvm/v0.39.1/install.sh | bash
# You'll need to source your .bashrc or restart your terminal
source ~/.bashrc
nvm install --lts

# Install Nginx
sudo apt install nginx -y

# Install PM2 globally with npm
npm install pm2 -g
With the tools in place, we cloned our project repository onto the server using Git.
# Clone your project into the home directory
git clone your-repo-url.git
cd your-project-name

# Install project dependencies
npm install
At this point, we could run and our app would be running, but only accessible from within the server itself. And if we closed our terminal, the app would stop. That’s where PM2 comes in.
npm startStep 2: Keeping the App Alive with PM2
PM2 is a lifesaver. Instead of running our app with , we use PM2 to manage it as a persistent background process.
node app.js# Start the application with PM2 # We give it a name to make it easier to manage pm2 start npm --name my-app -- start
PM2 immediately puts the app into its process list. You can check the status with or see live logs with .
pm2 listpm2 logs my-appThe most important step is making PM2 itself start automatically on system boot. PM2 has a handy command for this.
# This generates a command you need to run to register PM2 as a startup service
pm2 startup

# After running the command it gives you, save the current process list
pm2 save
Now, our app will restart if it crashes and will launch automatically if the server ever reboots. We were halfway there!
Step 3: Setting Up Nginx as a Reverse Proxy
Our app was running on, let's say, . We needed a way for the outside world to access it through a standard domain name on port 80. This is Nginx's job.
localhost:3000We needed to create a new Nginx configuration file for our site.
# Create a new config file (use your domain name)
sudo nano /etc/nginx/sites-available/yourdomain.com
This is where we hit our first real snag. Nginx configs can be intimidating. After a bit of trial and error, we landed on this solid, basic configuration.
Our Go-To Nginx Config
server {
    listen 80;
    server_name yourdomain.com www.yourdomain.com;

    location / {
        proxy_pass http://localhost:3000; # The port your Node app is running on
        proxy_http_version 1.1;
        proxy_set_header Upgrade $http_upgrade;
        proxy_set_header Connection 'upgrade';
        proxy_set_header Host $host;
        proxy_cache_bypass $http_upgrade;
    }
}
This tells Nginx: "Listen for traffic for on port 80. When you get it, pass it straight to the service running on ."
yourdomain.comhttp://localhost:3000To enable this new config, we had to create a symbolic link to it in the directory. This is a step we forgot the first time, and we spent a good 30 minutes wondering why our old config was still active.
sites-enabled# Create the symlink to enable the site sudo ln -s /etc/nginx/sites-available/yourdomain.com /etc/nginx/sites-enabled/ # It's also good practice to remove the default config sudo rm /etc/nginx/sites-enabled/default # Test the Nginx configuration for syntax errors sudo nginx -t # If it's all good, reload Nginx to apply the changes sudo systemctl reload nginx
Real-World Hurdles We Hit
- The Firewall: We configured everything perfectly, but still couldn't access the site. The reason? The server's firewall () was blocking traffic. We had to explicitly allow Nginx traffic:
ufw. A simple fix that cost us an hour of debugging.sudo ufw allow 'Nginx Full' - Environment Variables: Our app relies on a file for database credentials and API keys. We initially forgot to copy our
.envfile to the server. PM2 can also manage these, but for simplicity, placing a.envfile in the project root on the server worked for us..env - Permissions: We ran into a few errors when our app tried to write to a log file. This came down to file ownership. We had to make sure the user running the Node process had the correct permissions for the directories it needed to access.
EACCES
Our Final Reflection
Setting up our own deployment pipeline was a journey, but it gave us a profound appreciation for what happens under the hood. The control and understanding we gained are invaluable. It forced us to think about security, process management, and networking in a way that managed platforms had previously abstracted away, and we're better engineers for it.